How to Bulk Import Contacts

Whether this is your first CRM or you are moving from another system, importing lets you create records and update your existing database.

Each row represents a contact record, and each information column represents a contact property (First Name, Last Name, Email Address, etc.)

Having issues importing contacts?
Troubleshooting Bulk Imports Via CSV

Prerequisites:

  • Only users with an ‘Admin’ role will have the option to import and export contacts.
  • The import file needs to be a .csv file
  • Have only one sheet/tab within the spreadsheet
  • Be smaller than 50MB
    (Note: a typical .csv file with 4 columns and 10,000 records will be ~500kb in size)
  • The first row should NOT be blank! Include a header row in which at least one column header corresponds to a field in the system.

Step 1: Setting up your CSV and Custom Fields before importing

Please note:

– When adding a phone number that requires a “+” sign, please add an apostrophe at the beginning of the number, like this: ‘+191668128779 (Correct format).

– File Upload and Signature Fields are NOT supported when importing

Step 2: Check for duplicates

It’s always best practice to clean your list and check for duplicates before importing into any software, especially if you are running cold traffic campaigns. Failure to do so can results in deliverability issues

Step 3: Importing your contacts

There are two methods to import contacts depending on your CSV data:

1st Method: If your CSV has a phone # and or email please follow the 1st method below

2nd Method: If your CSV does NOT have an email and or phone #, please follow the 2nd method below (Getting contact ID)

1st Method: If your CSV has a phone # and or email, please follow this CSV setup guide

Contact ID unique identifier only shows up if you have a column header with Contact ID written as the header title. 

When selecting the unique identifier (Email, Phone or Contact ID) The system will only use identifier selected. It will not use the phone number during the import.

Example: My CSV has mixed emails and phone numbers, some contacts share emails like

2nd Method: If your CSV does NOT have an email and or phone #, please watch the video below

Please Note:
Contact ID unique identifier only shows up if you have a column header with Contact ID written as the header title. 

When selecting the unique identifier (Email, Phone or Contact ID) The system will only use identifier selected. It will not use the phone number during the import.

Example: My CSV has mixed emails and phone numbers, some contacts share emails

Breaking down advanced filters:

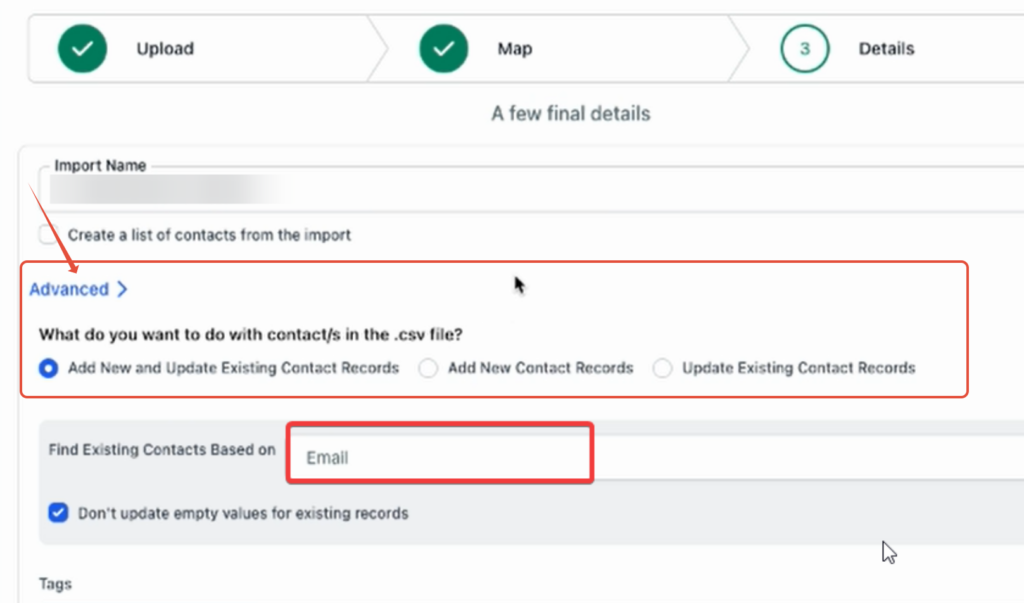
Add New and Update Existing Contact Records:

This means that it will create new contacts, and if you have any leads already in the system, it will update them with the information from your CSV file. The system will check for existing contacts in the sub-account based on the unique identifier (Email, phone, or contact id) you selected (Primary or Secondary preference).

Add New Contact Records:

This will create new contact records and will not update existing contacts in the location.

Update Existing Contact Records:

This option will only update existing contact records and not create new contacts in the location.

Please Note:
While the default unique identifier is Email, our system allows you to choose fields other than Email for de-duplication purposes during the Bulk CSV Upload